I built a custom keyboard
Posted on October 16, 2025 • 8 min read • 1,648 wordsI went to extremes to sort out my wrist pain, and learnt something cool along the way.
So back in March I started struggling with bad wrist pain, which turned into very bad shoulder pain as well. I was able to eventually see my GP who diagnosed me with De Quervain’s tensoynovitis and referred me to a physio for treatment and did actually perscribe me codeine for the pain as well. The physio also said I had a frozen shoulder due to me compensating form and then protecting, my wrist. In short, I was not able to use my right hand for a while, and spent almost three months in some form of pain. Thankfully the physio was able to get me back to 100% with my wrist and my shoulder is about 90% although I am still lacking a lot of strength but that is slowly coming back with exercise. One of the thing the physio suggested I to prevent any recurance, is look at making my work setup as ergonomic as possible, big wins being my keyboard and mouse.
So down a rabbithole I went on office desk and computer ergonomics, and eventually settled on building my own split keyboard as most that were commercially available were either extremely exspensive or just the ugliest things I had ever seen. This route also let me scratch my “I want to understand how this works” itch too.
I started with reading up on how to go about building a keyboard and then into learning about split keyboards and all the various options such form factor, layouts, controllers, firmware etc.
I recommend watching Ben Vallack’s youtube videos as they are a fantastic resource. I also worked through the tutorial by Flat foot fox. Christian Selig’s blog post on his build, he also has a nice overview video too, is a great intro in to what is involved in building your own split keyboard.
So how did I go about my build?
I had to first decide on what layout I wanted on my keyboard. I spent alot of time looking at what people had already built and what was possible, I realised very quickly I didn’t want to spend the time designing a custom PCB to get the perfect layout and number of keys for me, so decided on going with a SOFLE style layout, as it gave me a good compromise on the number of keys I needed to reduce the need to learn the layers and what keys they contain, and the need to also reduce the size of the keyboard.
I eventually bought everything from Splitkb.com as they have a lot of different style kits and also a really great wizard that guides you step by step through each choice you need to make depending on the base kit you pick. My eventual keyboard was made up as follows:
- Aurora Sofle V2 (Choc Hotswappable)
- Nice!Nano Wirelesse Microcontrollers
- Nice!View MIP Displays
- Auror Sofle V2 Low Profile Cases (Black acrylic bottoms, bead blasted aluminium top plate)
- Tactile Rotary Encoders with Knurled Black Metal knobs
- MBK PBT Keycaps (various colours & no legends)
- Kailh Sunset Low Profile Choc switches
I have left some other parts off the list such as the wireless controller expansion bundle as they are suggested by the wizard.
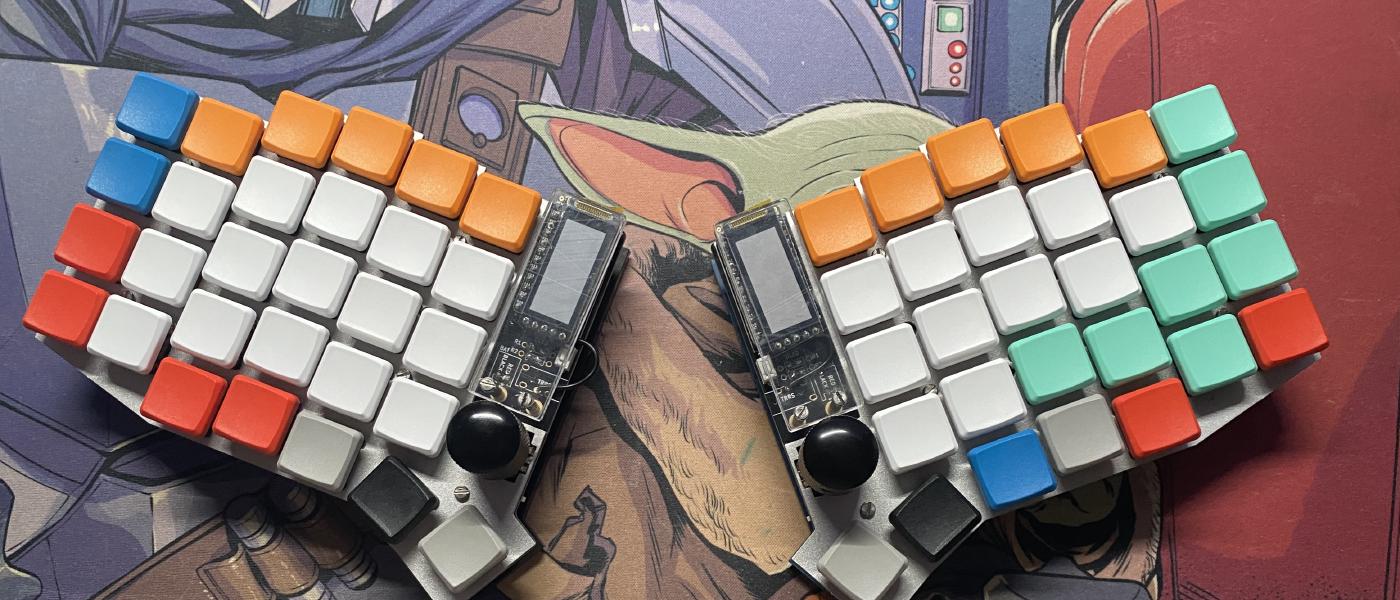
I also decided to get keycaps that had no legends, firstly because they are more expensive, but also I couldn’t find any windows based legends. I eventually got different colours for different key groups. White are all Alpha keys, Orange are numbers and function keys, red for modifiers such as shift and control, black for Windows, grey for layer, enter, and space, green for symbols, and blue for others like ESC and tab.
The only thing I couldn’t get from SplitKB were the batteries, which I purchased from a local supplier here in the UK, The PiHut. I got a 2000mAh 3.7V LiPo batteries, one per half of my keyboard. The only extra items I needed where longer standoffs than what came with the kit from SplitKB as my batteries where much thicker than the recommended options in their wiki.
Once it arrived, I had to put it all together, and be warned the components like the diodes, resistors, etc. are tiny and you will need to solder them on to the PCBs. So suggest you get some practice in as it takes a steady hand to get this right.
One note I have on my keyboard, is I decided to forego any RGB to extend my battery life and to be honest I didn’t want to be fiddling with RGB pieces that are really touchy about getting too hot when you solder them on.
It took me about 5 hours all in to have a complete keyboard, and to be honest the build guides on SplitKB’s website are fantastic and make it very easy to build, but I took my time as the components where tiny and i didn’t want to risk soldering some of the directional ones in the wrong way. There is also a very helpful discord community that I reached out to a couple of times during my build for some help/
Firmware
The next bit to get done was the firmware and keymaps. At the time, since I wanted a wireless keyboard, ZMK was the only option but its a very solid option and is actively been worked on. SplitKB have worked with the ZMK developers to include their kits in the firmware so you do have the option of downloading a firmware from them and you just install it on your keyboard and off you go, but then you are restricted to using the keymaps they put together, and I felt that those didn’t work for me.
Thankfully, as long as you know how to use Github, you can build your own custom firmware. ZMK have small script to run that will setup the base firmware according to the controller and shield you have, again SplitKB kits are given to you as options for the shields, this builds out everything you need with a default keymap. You then push this to your github repo and actions will build a release of your firmware for you, which you just download to a machine and then install to your keyboard.
Installing the firmware is pretty easy, you get two files in the zip, one for the left controller and one for the right. All you do is make sure the keyboard is powered on, and then connect them by a USB cable to your computer. Double pressing the reset button on the half which will make it available as a drive on your computer and you just copy the firmware for the appropriate half on to it, the half will restart and install the firmware.
To be honest, I have made about 60 changes to my keymap since first using the keyboard, I have stuck to small changes so its easy to roll back if I find its not quite right. my process was for the keymap file was:
- Get day to day keys (emails, documents, etc.)
- Keys generally used in development/coding.
- Gaming
Living with it
You need to be patient when switching to a split keyboard from a traditional row staggered keyboard, you will really struggle at first. I went from being a fluent touch typist to having to watch my fingers and getting about 10 words out a minute. Its down to your brain and muscles having to relearn a layout. I am now about 4 months into using it as my daily driver, and while I am at about 80% in terms of typing speed of what I was, I still find my fingers occassionally getting stuck and not hitting the correct keys and I get caught in a mad panic of just hitting keys to find the right one. I did solve this a bit by getting what are called homing keycaps, they have a little ridge on them, and putting them on a central key that I would rest my middle finger on. This gives me a reference point to figure out where the keys are.
The pace at which you learn your keyboard is entirely down to the layout change you made, I stayed with QWERTY but split and then also moved to a column stagger, so I knew where the keys were in rows but they had just shifted slightly up, and also the amount of time you spending on typing practice tools. I also took some time finding the right position and angle for each half, I now know when its not right as I immediately can’t hit any of the right keys. I have read some horror stories of people also switching from QWERTY to something else and taking months getting to 50 words a minute.
The Wins
- Physically, I don’t get much fatigue in my wrists, arms and shoulders anymore because they are in a more natural position.
- The smaller desk footprint
- Layers, because I have few keys to work with, the firmware has layers to allow you to assign more than one key to a key. This took some getting used to, I kept forgetting to hit the layer up or layer down keys to activate a layer to get a specific key but I am there now, but I do tend to forget what layer my lesser used keys are one.
This was a very rewarding thing to do, I loved building my own keyboard but the biggest thing is making it easier on my body and preventing injury reoccurance which there is a good chance of. I am of the opion that anyone who spends more than an hour or two at a keyboard every day should seriously consider a split keyboard, its better for you, plus it makes your desk look like a cool NASA command center, and who doesn’t want that?